将 OpooPress 静态博客部署到 Google App Engine(GAE)
Google App Engine(GAE) 相信都不陌生,最近 GAE 又增加了 Push-to-Deploy 功能,意味着可以通过 git 工具部署 GAE 应用了。 本文就主要介绍如何将 OpooPress 生成的静态博客部署到 GAE。
前文所说的七牛云存储在国内的速度的确非常优秀,但在国外表现就属于普通了。
GAE 则不同,笔者使用多点 PING,发现自己的应用所在的 GAE 节点在全球的响应速度都非常好,所有线路平均 60 多毫秒。 但 GAE 的缺点也是很明显的:一是免费配额比较低,二是它提供的二级域名是无法直接访问的。
同样本文不介绍如何安装 OpooPress 静态博客,以及如何通过命令生成静态网站,相关知识请参考 OpooPress 文档。
将 OpooPress 静态博客发布到 GAE 有两种方式:通过 App Engine SDK 提供的工具;通过 git 客户端。
由于 OpooPress 生成的是全静态的网站,所以选择 Python 版配置即可,配置文件 app.yaml 如下:
application: <your-app-id>
version: <version>
runtime: python27
api_version: 1
threadsafe: yes

default_expiration: "10d"

handlers:
- url: /
  static_files: index.html
  upload: index.html

- url: /(.*)/
  static_files: \1/index.html
  upload: (.*)/index.html

- url: /app.yaml
  static_files: index.html
  upload: index.html

- url: /(.*)
  static_files: \1
  upload: (.*)
注意替换 your-app-id 为你的应用的 id,version 仅仅是一个标识,你可以随意设置,在 GAE 中将当前版本设置成默认即可。绑定泛域名可以访问所有版本,参考这篇文章。
关于 app.yaml 更详细的内容请阅读官方文档《Python 应用程序配置》。
将 app.yaml 放在 OpooPress 的生成目录中(如 D:\myblog\target\public\site)或者静态资源目录中
(如 D:\myblog\site\assets,会自动复制到站点生成目录),就可以将生成目录变成一个 GAE 的应用。
通过 Google App Engine Launcher 发布
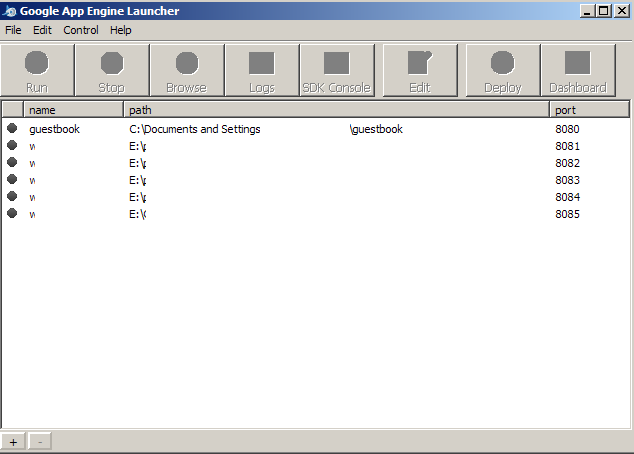
以 Windows 为例,在下载安装 Python 版本的 App Engine SDK 之后, 就可以从 Windows 开始菜单启动 Google App Engine Launcher 了。其界面如下:

打开菜单 File -> Add Existing Application…,选择 OpooPress 博客的生成目录(例如 D:\myblog\target\public\site),即可将博客站点添加进来。之后就可以点击 Run 按钮运行站点,进行阅览,或者直接点击 Deploy 按钮将博客站点发布到 GAE 上。
通过 Git 客户端发布
Google App Engine 最近增加了一个叫着 Push-to-Deploy 的功能,
可以通过 git 客户端 push GAE 应用到一个特定的库,push 完成后,会自动将库中的文件部署到 GAE。
可参考官方文档《Using Git and Push-to-Deploy》。
由于文档目前只有英文版本,所以这里还是大致叙述一下步骤。
在 GAE 添加 Google Cloud 集成
这一点在文档中似乎没有提到。
在 Google App Engine 管理页面选择进入你的应用,在左边菜单选择 Application Settings,在页面底部,找到 Cloud Integration,点击 Add project 完成设置。
启用 Push-to-Deploy
- 进入 Google Cloud Console,选择你要启用 Push-to-Deploy 的项目。
- 通过左侧菜单
Cloud Development进入 Push-to-Deploy 配置页面。如果没有在 GAE 中添加 Cloud 集成,这里将看不到这个菜单。 - 点击
Create new repository按钮来创建一个 git 库。创建完成后会显示库的 url(形式如 https://code.google.com/id/xxxxxxx/),请记住该 url。 - 点击
Get password按钮,在弹出的窗口中点击Accept,即可显示登录该 git 库的密码。 - 在 Windows 下用户主目录(例如 C:\Documents and Settings\xxx\)中创建名称为
_netrc的文本文件,内容如下machine code.google.com login <email-address> password <auth-token>
其中email-address为等路 GAE 的 Email 帐号,auth-token就是上一步中获取的密码。
使用 Push-to-Deploy 发布 OpooPresss 有三种方式可以使用 Push-to-Deploy,选任一种即可。
将 GAE 远程库作为非 origin 库
cd <directory of OpooPress output, containing app.yaml file>
git init
git add ./
git commit -m 'Initial version' -a
git remote add appengine <repo-url>

git push appengine master
将 GAE 远程库作为 origin 库
git clone <repo-url> mysite
# 复制博客输出文件到 mysite 目录
cd mysite
git commit -a -m "Add my site"
git push
使用 OpooPress 本身的 deploy 功能
可参考文档《发布到 GitHub Pages》,选用
opoopress-wagon-git即可。此时需要在 OpooPress 博客主配置文件中配置
deploy_server。deploy_server: {id: "gae", url: "git:https://code.google.com/id/xxxxxxx/", branch: "master"}然后执行
mvn op:deploy即可发布。
示例
这是一个部署在 GAE 上的 OpooPress 站点:http://opoopress.web.wondor.com/
| Source |
|
On GitHub
- Status updating...
标签
-
OpooPress15
开源6
WordPress6
Maven4
Web Fonts3
七牛云存储3
TeamForge3
SourceForge3
Octopress3
cookie-free3
博客2
JDBC2
JOQS2
ORM2
Google App Engine2
Godaddy2
VPS2
Spring2
Apache2
VMware2
vSphere2
ESXi2
ESXi-Customizer2
Realtek2
虚拟化2
Theme2
插件1
前端优化1
社会化分享1
多说1
云存储1
反向代理1
git1
gradle1
AJDT1
AspectJ1
CTW1
DocBook1
GitHub1
Dropbox1
octowatcher1
Pyinotify1
OpenShift1
economy1
web host1
ActiveMQ1
JMS1
SSL1
RingList1
Ring Buffer1
Disqus1
Google Analytics1
遍历文件夹1
github-pages1
Jive EOS1
Google1
WebFlux1
DataBuffer1
Mailet1
Oracle Coherence1
RTL8111e1
88SE92301
GitHub Pages1
Video1
SEO1
Google Web Fonts1
CentOS1
静态网站0